
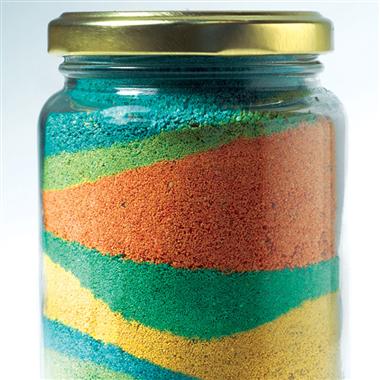
What do you think of when you hear Sand Art? I think of colored sand layered in a jar. Well, you can do that, but you can also do so much more!
How to make colored sand
- Sand
- liquid food coloring
- small jar or container with lid
- paper towel
- Put some sand in your container and add a few drops of liquid food coloring.
- Put the lid back on and shake it like crazy!
- Lay out on paper towel until it dries.


Hint: If you don't have sand, you can also use salt.
I found this colored sand on clearance at Wal-Mart. It was $1.00 a bottle, and I like the colors, so I got it. Here's what I did with it and some other ideas too.

Sand art candle holders
- colored sand
- some sort of container to hold the sand and candle
- candle
- Layer the sand in the desired colors until the container is 2/3 to 3/4 full.
- If you are using a tapered candle push it down into the sand far enough that it will stand on it's own. If you are using a votive candle, the kind that comes in a little plastic container is best. Just set it on top and push it down into the sand a little. Then when it burns down you can lift it out and put another one in. (I didn't push the candles in becuase I want to get some candles that actually match my new candle holders.)


Sand art cards and pictures
- Card stock (or other thick paper so it doesn't warp when it dries)
- craft glue or other liquid glue
- old paint brush
- colored sand
- Cookie sheet or box lid to contain your sand
- Print out the design you want to use or draw it lightly with a pencil.
- Add just a little bit of water to your glue so that you can paint it onto your paper.
- Paint the section of paper you want to color first.
- Pour sand onto glue and let dry for a few minutes.
- Carefully shake the excess sand off of the paper.
- Continue using other colors until you are done.
If you want a thick border around parts of your artwork, squeeze a thin bead of glue onto your work and sprinkle sand directly onto it. Shake off when done. (this picture is from elmers.com)

If you think this is a cool idea, but don't want to go to all the work, you can just order a sand art kit from a place like this.

As I was looking up all of the different things you can do with sand I found this lamp. Isn't it cool. You can see the web page here.

Have you done something for Messy Monday? Link it up!!
Here are the rules.
1. Link to the actual blog post, not to your general blog address.
2. Copy and past the Messy Monday html code and put it in your post so everyone else knows how to get back here and see what others have done.


3. Visit the other Messy Monday links and leave them some comment love!
I am also linking these to the following sites. Go check them out!


5 comments:
This is such a great tutorial & fun idea! I'd love it if you'd link up to it at my Sharing Time post!
http://heathernow.blogspot.com/2010/05/sharing-time.html
I'll add a couple of products to your link up here, too :)
What a cute idea. Great instructions. Diane
Thanks so much for linking up! It would be great if you could add the Sharing Time button to your post! http://heathernow.blogspot.com/2010/05/sharing-time.html
Thanks Sarah, I hope to see more from you next week! :)
~Heather
I’d have to test with you here. Which is not something I normally do! I enjoy studying a put up that may make people think. Also, thanks for allowing me to remark! online casinos for us players
Post a Comment